Summary
In this article, we'll walk through what Jornaya Pre-Audit is and all of the steps for utilizing Jornaya's Pre-Audit.
What is Jornaya Pre-Audit?
Pre-Audit is a simple API call to the Jornaya platform, giving you real-time access to a lead buyer’s Audit Profile. This allows you to identify whether your lead will be given a “Green”, “Yellow”, or “Red” flag based on a buyer’s Audit Profile. You should work directly with the owner of that Audit Profile to understand the actions that will be taken based on this result.
Step 1: Connect with the Buyer and Validate Permissions
Verify permission
Contact your buyer to verify you have permission to pre-audit the LeadiD tokens sent to them if you were not asked to do so.
Confirm your connection to your buyer
Email vmssupport@verisk.com with their name and request permission to pre-audit them. Please provide any proof from the buyer that you have their consent to do so.
Jornaya will validate and set permissions, as well as provide you the Entity code to be used in the 'lec' parameter of the query string.
Step 2: API Set-Up
Within the Jornaya Member Portal, go to the Pre-Audit tab > API Instructions. Build the Pre-Audit API request string using the parameters in these instructions and you can reference the full Pre-Audit API specifications here. For reference, below is a sample of the Pre-Audit API structure.
For reference please see the full Pre-Audit API spec that lists the expected responses.
Example Request Structure (GET method)
https://api.leadid.com/SinglePreAudit?lac=ACCOUNTCODE&id=LEADIDTOKEN&lec=ENTITYCODE&data=DATA
Parameter Definitions
Name | Value | Required | Description |
URL | https://api.leadid.com/SinglePreAudit | Yes | The URL to be used for the query. |
Method | GET or POST | Yes | The HTTPS method to be used. |
lac | xxxxxxxx-xxxx-xxxx-xxxx | Yes | Your Jornaya Account Code. |
id | 36 Character LeadiD token | Yes | The LeadiD token. |
lec | xxxxxxxx-xxxx-xxxx-xxxx | Yes | The Entity Code of the party to whom you plan to sell the lead. |
lpc | Alphanumeric string | No | A value that identifies the Provider from whom you received this lead. |
data | Pipe | Separated Data with field data labels delimited by semicolons. e.g., email;joe@smith.com|f_name;joe | No | The data for which you want to determine Data Integrity. Note: a list of Data Integrity Field Data Labels can be found at the end of this document. |
format | json, xml | No | The format in which you would like the data returned. The default value is JSON. |
Step 3: Test
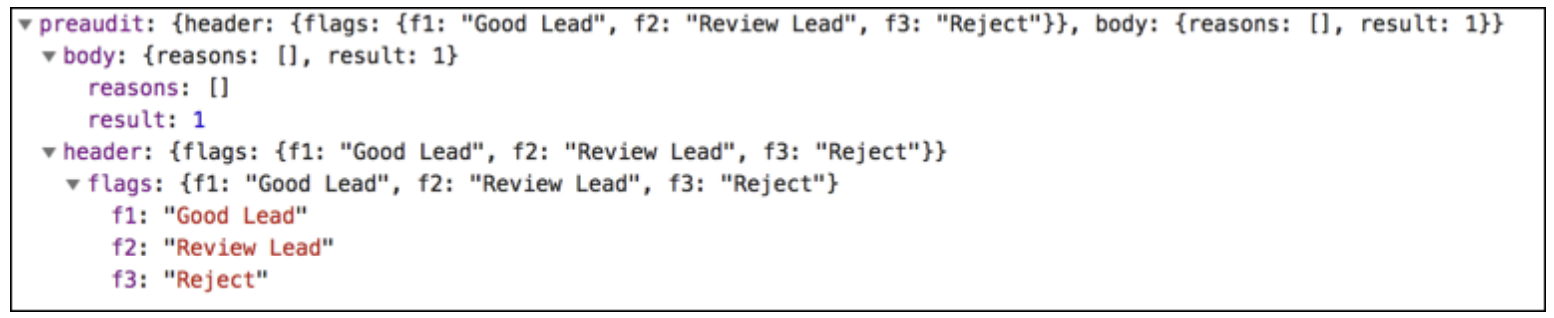
Receiving a Successful Response:
Enter a LeadiD token into the query and confirm you are receiving a successful response where the "result" field in the body is a "1" or Green.
Successful Response Example:
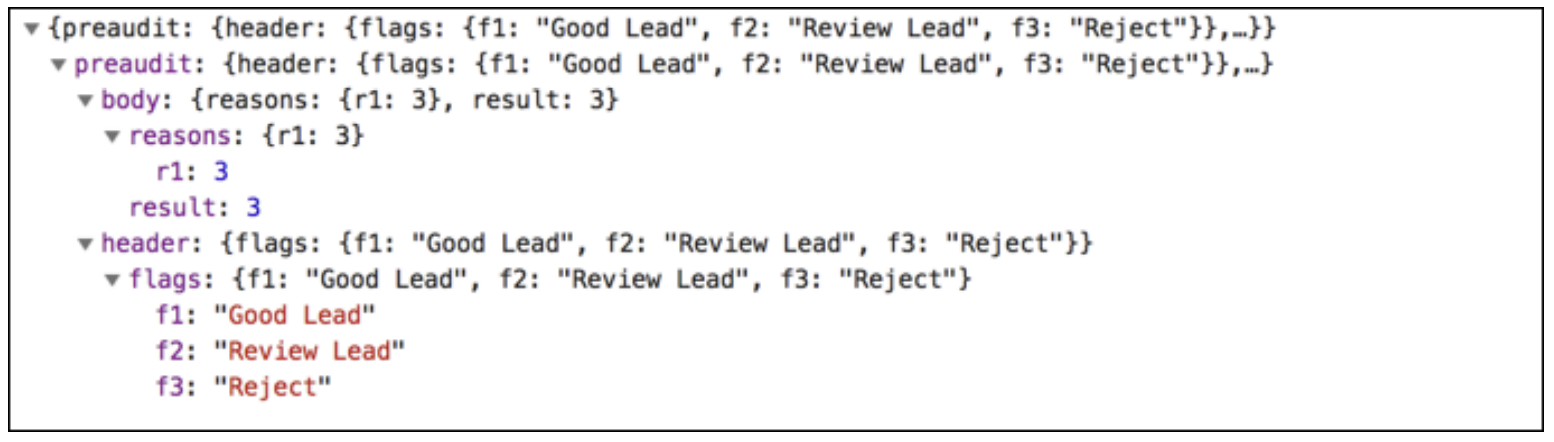
The result field is NOT 1
Review the "r" reasons in conjunction with the Pre-Audit API specifications page to determine the issue. If you're unsure how to resolve it please contact support at vmssupport@verisk.com.
Example: Using the screenshot below you can see an "r1" reason was returned. When looking this up in the API spec you can see this is related to a token that is not authentic.
Common Error Responses:
Connection Not Enabled:
error: {code:403, message: Permission denied}
Permission Error
If you receive the Permission denied error, please refer to Step 1 to make sure that you have connected with the Jornaya support team to have permissions validated and enabled.
Inauthentic LeadiD Token:
What's Next?
Contact the support team at vmssupport@verisk.com with any questions about your responses or to confirm your query is correct. Then let your buyer know you're all set to pre-audit tokens.